Tuesday, November 16, 2010

Butterfly & Flower Cakes

A very sweet little girl had her first birthday last weekend and I had the privilege of making her special cake. Her mom found adorable paper plates that were the inspiration for the party and the cakes.

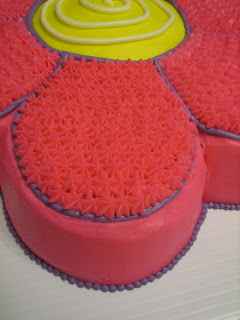
The big birthday cake used a Wilton daisy shape pan and the personal cake for the birthday girl was just a single layer 6-inch round cake.

This was my first time baking a shaped cake and I was so excited. Perhaps a little too excited because I became impatient and did not let the cake cool as long as I should have…I’m pretty sure that’s why the first cake ended up like this:

I thought about trying to salvage it, but decided it was easier to bake a new cake. Don’t worry, this cake didn’t go to waste, you’ll see what it turned into in an upcoming post.

The second cake turned out much better.

Since this was my first time making a shaped cake, I wanted to make sure it wouldn’t stick to the pan, so I tried the Wilton Bake Easy Spray. I loved it, it worked perfectly (even on the first cake), and it’s so much easier than using shortening and flour!

For decorating the shaped cake I just used butter cream icing (you can see the recipe I use here).

For the birthday girl’s cake, though, I used a bit more to make sure it really matched the plates and was fun and girly. Obviously, I used butter cream icing as the base in the same color as the flower cake. For the white daisies I used royal icing flowers I had made previously. To really match the plate though, I needed to have butterflies. I decided to make the butterflies and the name out of colored chocolates. I have done names in chocolate before (here and here). However, I haven’t tried any detail shapes in chocolate until this; down below I show how I made the butterflies. I didn't use all the exact same colors because, well, the chocolates get a little pricey, but the patterns match pretty closely. I think they turned out very well.

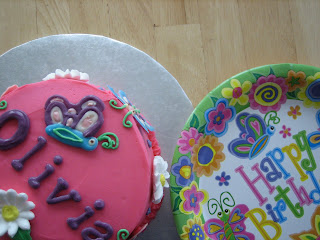
I traced the butterflies on the plate onto plain paper. I then placed that paper on a cookie sheet and covered it with wax paper (I did tape down the paper and the wax paper so it wouldn’t move).

I melted the different colored chocolates in squeeze bottles and then used the traced outlines as guides. I would do one color, let it set for a bit and then switch to another color and let it set for a bit, and so on. Once I completed all the details that I wanted to do with the chocolate I placed the cookie sheet in the fridge to set completely.

When it came time to decorate the cake, I just carefully peeled the chocolate pieces (butterflies and letters) away from the wax paper and then attached them to the cake with butter cream.

Despite the first cake setback, overall this project was a success. I hope the sweet birthday girl enjoyed it!

Wednesday, November 3, 2010

Party Post: Mickey Mouse

My very creative and talented friend and her sister-in-law put together an adorable Mickey Mouse birthday party for their little boys. Without the party there would have been no need for the cake or the cupcakes.

Everything matched so perfectly.

Take a look at all the cute details they put together for this party; most of which were handmade!

Homemade Pinata!

Not only did my friend make a pinata cuter than anything I've ever seen in the store, she also made matching treat bags for each of the kids to put their pinata candy in. Great idea and very cute.

Each child got their own treat bag to stuff with pinata candy!

A pinata is a great activity for a children's birthday party, but so are party games. My friend did a twist on the classic "pin the tail on the donkey" with a "put Mickey together" game. It was darling.

Each child was handed a different piece of Mickey and then blindfolded and had to put their piece up on the wall.

My friend's sister-in-law made the screen printed window decal and the matching screen printed shirts for the birthday boys (the number on the front was how old they turned). There was also something on the back of the shirts, but I didn't get a picture of the back and I can't remember what it was, but I remember it was cute.

I love the idea of a special shirt/outfit for the birthday child.

My friend's sister-in-law also made super cute Oreo Mickey Mouse treats, but I couldn't find a good picture of them in the shots I took at the party :( You can kind of see them in the first picture of this post on the left side of the table.

This was too cute not to share.

Yum!

Adorable!

Although I will note that the Mint Patty ear was not as popular as the frosting and cupcake. And apparently there was plenty of frosting on the cake!

These ladies did such a great job on this party theme. I hope you enjoy the pictures and ideas as much as I did!

Tuesday, November 2, 2010

Mickey Mouse Cupcakes

Along with the Mickey Mouse cake, I was asked to make Mickey Mouse cupcakes. As I mentioned in yesterday’s post the idea for the cupcakes was one of my first sketches after I got the request to bake for the Mickey Mouse party. I wanted to play off the look of a Mickey Mouse ear hat, but I knew I’d have to do something with the bottom of the cupcake and I thought making the liner his shorts would be perfect!

I went out to the grocery store to find just the right size ears. I decided Oreos were a tad too big, chocolate wafers were also too big. Even the York Peppermint Patties didn’t seem quite right, but then I found something similar – Pearson’s Mint Patties. Next, I had to find buttons for his shorts. I knew the jumbo sprinkles I used for the cake would be too large. I originally thought I would use yellow M&M’s, so I stopped by Party City to pick up a bag of yellow M&M’s; yes, they sell bags of individual colors. I was a little worried that the M&M’s might still be too big and/or too heavy to stay attached to the liners. So I checked out the rest of the wonderful candy section at Party City and found the perfect solution – yellow chocolate covered sunflower seeds. They were also MUCH cheaper than the bag of yellow M&M’s, yay!

I baked the cupcakes in plain bright red liners. I used chocolate buttercream icing for the tops; although I didn’t get as good as a color as I got on the cake and I couldn’t get the color quite dark enough to match the dark chocolate of the Pearson Mint Patties. I was a little bummed about that, but eventually I figured it was close enough and when it all came together it was so cute that it didn’t bother me that much.

I very generously iced the cupcakes to get as much of a dome shape as I could; I then stuck in two Mint Patties for the ears and used the icing on the back of the ears to help secure them in place. The icing is a great glue; especially if you put it in the fridge to set-up some.

Mickey took over my fridge.

I then used some red icing (leftover from the cake border) to attach the yellow chocolate covered sunflower seeds to the cupcake liners for the buttons on his shorts.

These weren’t very complicated cupcakes, but they were SUPER cute!

They get cuter when you see them with everything else at the party that my very creative friend and her sister-in-law planned. You won’t want to miss tomorrow’s party post!

Monday, November 1, 2010

Mickey Mouse Cake

I was asked to make a cake for the birthday of a 2 year old boy and a 4 year old boy, the theme – Mickey Mouse. There were a number of ideas and sketches thrown around…Mickey Mouse Clubhouse, Mickey Mouse hat, Mickey Mouse ears, Mickey’s face and maybe a few more. The cupcakes were one of my original sketches and ended up being perfect for the theme!

Then, one of the blogs I follow had recently posted a video about these adorable Mickey & Minnie caramel apples. I sent the link over to my friend and she loved them, so that solidified the plan for the cake.

Originally I was going to use the 6-inch cake as the head and cut out ears with cookie cutters from a larger cake; but I decided that it didn’t look as good. So, I used an 8 inch pan for the head and the 6 inch pans for the ears.

Getting Started
A while back I learned a nifty little trick for baking chocolate cakes; I think I saw it on a public television show, but I don’t remember exactly where I learned it. It’s a trick that I’ve used a few times and it definitely came in handy for this project.

Tip: When preparing your pans for a chocolate cake, use cocoa powder instead of flour after you grease the pans. The cocoa powder does not show up as much on a chocolate cake as the white flour would. And the cake comes out perfect!

Prepared Cake Pan

Cake Just Out of the Pan

After you get the cake layers level, assemble the layers with your desired filling. I used chocolate cream cheese icing. I then placed the cake in the fridge until I was ready to decorate.

Decorating
I used my usual buttercream icing recipe. For the ‘shorts’ I wanted to get a red sugar coating to match the caramel apples. I started by only frosting the bottom half of the cake with a red-ish tinted icing and then I covered with red sanding sugar. The top was easy, the sides were a little difficult and a little messy, but it eventually worked.

I then frosted the top half of the cake with chocolate icing that I tinted with black coloring. I frosted the ‘ear’ cakes with the same frosting. I smoothed out the frosting with an icing spatula. If you dip the spatula in hot water and wipe clean multiple times it helps smooth out the icing.

I thought doing the sugar coating on a cookie sheet would help contain the mess, but it didn't really.

I assembled the cakes on the cake board; make sure you 'glue' the individual cake boards to the large cake board with some icing.

Then used Wilton Decorating Icing (Red) to pipe a star border (Tip 21) around the entire cake. I have a hard time getting red icing as bright and vibrant as the pre-colored icing tubes, so I just bought some. Around the ‘shorts’ I topped the border stars with red hots and black Mickey head sprinkles that I found at Wal-Mart; the rest of the border I left as plain stars. I used the red icing to also attach two yellow jumbo confetti sprinkles.

Waiting in the fridge.

Boxed up and ready to go!

I was very happy with how the cake turned out. And even happier when I saw the cake, the cupcakes and the rest of the party décor…just wait until you see it!

Cupcakes will be posted tomorrow and the party post will go up on Wednesday!