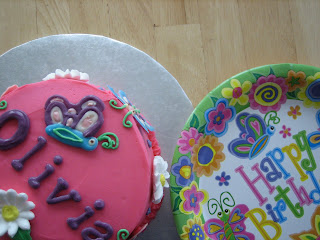
A very sweet little girl had her first birthday last weekend and I had the privilege of making her special cake. Her mom found adorable paper plates that were the inspiration for the party and the cakes.
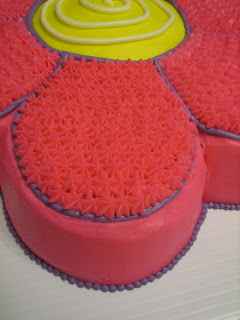
The big birthday cake used a Wilton daisy shape pan and the personal cake for the birthday girl was just a single layer 6-inch round cake.
This was my first time baking a shaped cake and I was so excited. Perhaps a little too excited because I became impatient and did not let the cake cool as long as I should have…I’m pretty sure that’s why the first cake ended up like this:
I thought about trying to salvage it, but decided it was easier to bake a new cake. Don’t worry, this cake didn’t go to waste, you’ll see what it turned into in an upcoming post.
The second cake turned out much better.
Since this was my first time making a shaped cake, I wanted to make sure it wouldn’t stick to the pan, so I tried the Wilton Bake Easy Spray. I loved it, it worked perfectly (even on the first cake), and it’s so much easier than using shortening and flour!
For decorating the shaped cake I just used butter cream icing (you can see the recipe I use here).
For the birthday girl’s cake, though, I used a bit more to make sure it really matched the plates and was fun and girly. Obviously, I used butter cream icing as the base in the same color as the flower cake. For the white daisies I used royal icing flowers I had made previously. To really match the plate though, I needed to have butterflies. I decided to make the butterflies and the name out of colored chocolates. I have done names in chocolate before (here and here). However, I haven’t tried any detail shapes in chocolate until this; down below I show how I made the butterflies. I didn't use all the exact same colors because, well, the chocolates get a little pricey, but the patterns match pretty closely. I think they turned out very well.
I traced the butterflies on the plate onto plain paper. I then placed that paper on a cookie sheet and covered it with wax paper (I did tape down the paper and the wax paper so it wouldn’t move).
I melted the different colored chocolates in squeeze bottles and then used the traced outlines as guides. I would do one color, let it set for a bit and then switch to another color and let it set for a bit, and so on. Once I completed all the details that I wanted to do with the chocolate I placed the cookie sheet in the fridge to set completely.
When it came time to decorate the cake, I just carefully peeled the chocolate pieces (butterflies and letters) away from the wax paper and then attached them to the cake with butter cream.
Despite the first cake setback, overall this project was a success. I hope the sweet birthday girl enjoyed it!
Tuesday, November 16, 2010
Butterfly & Flower Cakes
Labels:
butter cream icing,
butterfly,
cake,
cake decorating,
flower,
Wilton
Subscribe to:
Post Comments (Atom)


No comments:
Post a Comment